

This article will try to give context on setting up a multihop Wireguard VPN by using a server to which clients would connect to and it would forward the VPN traffic to another VPN service like Mullvad, ProtonVPN, or any other Wireguard able VPN provider.
This simple diagram should pain what would be the main goal here:
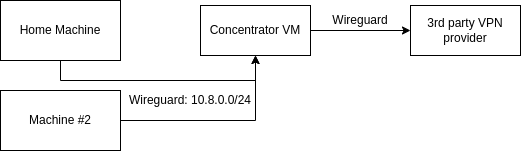
Reasons to have this setup might be different from the usual suspects – better privacy, security. But also it’s pretty exciting thing to set up and make it work.
Disclaimer
This article assumes that you have an understanding on Wireguard, VPN, and networking priciples.
The author is not responsible for any issues, damages, or legal issues. All advice here is provided as a proof of concept.
Understanding requirements
First you need to pick a VPN provider, there’s heaps of them, I’ve picked Mullvad. There are few factors to go trough if you want to optimise the setup.
Second part might be tricky – finding the right server ( dedicated / VPS ) provider. Especially if you’re on a VPS machine you want to consider few thigns first:
- VPS / dedi provider – check their test IPs and your network towards them using something like
mtr - Link speed: 1 Gbit or 10 Gbit for VPS machines. These are shared interfaces, so you don’t have a dedicated 10 Gbit link to your machine for $2.5 with a promotion. Especially if you plan to move a lot of traffic, you’re gonna get a nice email telling you to move away
- Home broadband speed – if it’s under 1 Gbit you’re good with 1 Gbit VPS. If you have 1 Gbit+ at home, obviously you’d need a bigger pipe.
- Bandwidth: depends how much traffic you are looking to move across this connection, but not that here you have incoming + outgoing traffic that is 1:1 . So a VM with 16 TB traffic will have 50% what you can utilize – 8 TB will be the limit.
- VM memory doesn’t matter, 1-2 GB will be plenty, unless you want to run some other thigns.
- Storage – doesn’t matter, you’re not storing anything on it.
- CPU is IMPORTANT. Depending on if you are going to max out the 1 Gbit connection, 4 CPU cores should be recommended
- You also need a KVM VPS machine, wireguard is a kernel module, and it won’t work on OpenVZ
For example, for 1 Gbit troughput, I chose a VM on 10Gbit link, with 4 CPU cores, 8 GB RAM and 32 TB bandwidth. After testing with few different VMs specs from different providers this showed as the best fit for my needs.
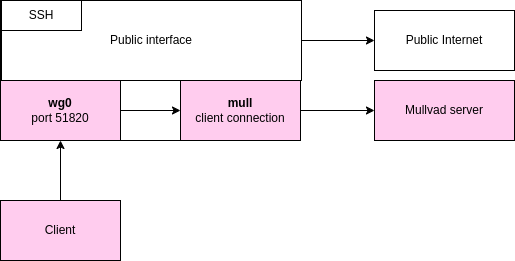
Setting up the initial client-to-VPS wg connection
Goal here:
- Setup the wireguard server and the client connecting via the wg0 interface with 10.8.0.0/24 network
- Prepare the Mullvad configuration that will be on mull interface
- Forward the traffic from wg0 inteface to mull interface
- Leave VM network untouched, so VM network will go trough public internet,meaning SSH will be publicly available to connect as a fallback.
Here we don’t need anything fancy, normal manual setup would do fine. First let’s make sure that Wireguard is installed
apt-get install wireguard-toolsLet’s create the servers private and public key.
wg genkey | tee /etc/wireguard/private.key
cat /etc/wireguard/private.key | wg pubkey | tee /etc/wireguard/public.keySample output with the base64 encoded private and public keys.
root@vps-116:~# wg genkey | tee /etc/wireguard/private.key
4A2qgPHh0d433PWCRQPjc9JmmIoRL1eEtISFk7uXnU4=
root@vps-116:~# cat /etc/wireguard/private.key | wg pubkey | tee /etc/wireguard/public.key
ikxhiBsNWEMipEluKvBc7Mq/5Gi+oQDlyh98WEn4TRQ=And finally let’s up the wireguard configuration in /etc/wireguard/wg0.conf . You don’t need to name it wg0, you can name it whatever you want.
# wg0.conf on VPS
[Interface]
PrivateKey = 4A2qgPHh0d433PWCRQPjc9JmmIoRL1eEtISFk7uXnU4=
Address = 10.8.0.1/24
SaveConfig = true
PostUp = iptables -I FORWARD -i %i -j REJECT
PostUp = iptables -I FORWARD -o %i -j REJECT
# The mull is the name of the client VPN, change this to your client interface name
PostUp = iptables -I FORWARD -i %i -o mull -j ACCEPT
PostUp = iptables -I FORWARD -o %i -m conntrack --ctstate RELATED,ESTABLISHED -j ACCEPT
# And change it here as well.
PreDown = iptables -D FORWARD -i %i -o mull -j ACCEPT
PreDown = iptables -D FORWARD -o %i -j REJECT
PreDown = iptables -D FORWARD -i %i -j REJECT
ListenPort = 51820
And this is the one third of the way done.
Set up the wg0 client
We are going for the client setup on the machine that will be connecting to the VPS/dedi machine. Note that this will showcase just adding one client. Adding more clients would follow the same priciple on the machine, just it would need an additional Peer block in the server configuration.
wg genkey | tee /etc/wireguard/private.key
cat /etc/wireguard/private.key | wg pubkey | tee /etc/wireguard/public.keyroot@my-local-machine:/etc/wireguard# wg genkey | tee /etc/wireguard/private.key
kA/udXhslPRciohXwJdSzvEPr/RX1/ks2mSvhjFz1ko=
root@my-local-machine:/etc/wireguard# cat /etc/wireguard/private.key | wg pubkey | tee /etc/wireguard/public.key
wWAIXq0XeSVd2ZZRAgwUD2mbeUQ6UGQ+DY7cR+64yQg=Now let’s configure the client configuration in /etc/wireguard/wg0.conf . For that you would need:
- VPS/Dedi servers public key
- Your machines private key that we just generated
- Pick an IP address from the 10.8.0.0/24 . 10.8.0.1/32 is usually taken by the VPS/Dedi machine Wireguard interface, so we’re just gonna go with 10.8.0.2/32. Real groundbreaking
- Finally you’re going to need the public IP address of the VM, let’s say it’s 1.2.3.4
# wg0.conf on the client machine
[Interface]
PrivateKey = kA/udXhslPRciohXwJdSzvEPr/RX1/ks2mSvhjFz1ko=
Address = 10.8.0.2/24
# If you're running a private DNS server, like pihole on the VPN machine.
# DNS = 10.8.0.1

[Peer]
PublicKey = ikxhiBsNWEMipEluKvBc7Mq/5Gi+oQDlyh98WEn4TRQ=
AllowedIPs = 0.0.0.0/0
Endpoint = 1.2.3.4:51820And to make this work, add the Peer to the wireguard configuration on the VPS/dedi machine.
# wg0.conf on VPS
[Interface]
PrivateKey = 4A2qgPHh0d433PWCRQPjc9JmmIoRL1eEtISFk7uXnU4=
Address = 10.8.0.1/24
SaveConfig = true
PostUp = iptables -I FORWARD -i %i -j REJECT
PostUp = iptables -I FORWARD -o %i -j REJECT
# The mull is the name of the client VPN, change this to your client interface name
PostUp = iptables -I FORWARD -i %i -o mull -j ACCEPT
PostUp = iptables -I FORWARD -o %i -m conntrack --ctstate RELATED,ESTABLISHED -j ACCEPT
# And change it here as well.
PreDown = iptables -D FORWARD -i %i -o mull -j ACCEPT
PreDown = iptables -D FORWARD -o %i -j REJECT
PreDown = iptables -D FORWARD -i %i -j REJECT
ListenPort = 51820


[Peer]
PublicKey = wWAIXq0XeSVd2ZZRAgwUD2mbeUQ6UGQ+DY7cR+64yQg=
AllowedIPs = 10.8.0.2/32
Mullvad VPN configuration with secret sauce
Login to your Mullvad account, create a Wireguard configuration, and for location, I’d suggest you pick one that’s closest to the VPS/dedi machine for peering purposes. You don’t want to go to, for example, to Germany where your VPS is and then send traffic to UK/France/USA, as it just adds additional network hops and increases your latency. Try to keep the network hops from the VPS machine to the Mullvad (or any other) VPN server as short as possible.
You’d compare:
- What is the Mullvad IP address and is it clashing with your own Wireguard network.
- See if you want to use the DNS or not.
The ip rules that make this happen are:
- 10.8.0.0/24 is our wg0 network
- 10.65.11.142/32 is the
Address=from the mullvad configuration file.
Adjust those values below
#### Routing configuration ####
Table = 123
PostUp = ip rule add from 10.8.0.0/24 table 123
PostUp = ip rule add from 10.65.11.142/32 table 123
PostUp = iptables -t nat -A POSTROUTING -o %i -j MASQUERADE

PreDown = ip rule del from 10.8.0.0/24 table 123
PreDown = ip rule del from 10.65.11.142/32 table 123
PreDown = iptables -t nat -D POSTROUTING -o %i -j MASQUERADE
#### End Routing configuration ####Below would be a example Mullvad config with the changes to be added to it:
/etc/wireguard/mull.conf
[Interface]
# Device: CrazyNameFromTheProvider
PrivateKey = <<PRIVATEKEY>>
Address = 10.65.11.142/32
# DNS = 10.64.0.1 # This has been kept commented as I don't want to use their DNS

#### Routing configuration ####
Table = 123
PostUp = ip rule add from 10.8.0.0/24 table 123
PostUp = ip rule add from 10.65.11.142/32 table 123
PostUp = iptables -t nat -A POSTROUTING -o %i -j MASQUERADE

PreDown = ip rule del from 10.8.0.0/24 table 123
PreDown = ip rule del from 10.65.11.142/32 table 123
PreDown = iptables -t nat -D POSTROUTING -o %i -j MASQUERADE
#### End Routing configuration ####
[Peer]
PublicKey = <<PUBLICKEY>>
AllowedIPs = 0.0.0.0/0
Endpoint = IP:PORTFinall step – run it
On the VPS/dedi server:
wg-quick up wg0
wg-quick up mullOn the client/home machine:
wg-quick up wg0Validate that everything is running
First validation:
- Your SSH connection to the VPS over SSH is working fine. We haven’t messed up the networking 🙂
- If it messes your networking, login to the console or reboot the machine via control panel. The wireguard changes aren’t permanent.
wg down $INTERFACEbrings everything down
Client machine
# Should give you the IP address of VPN endpoint IF not on mullvad
curl ifconfig.me

# Check mullvad

$ curl https://am.i.mullvad.net/connected
You are connected to Mullvad (server lc-city-wg-002). Your IP address is 22.33.44.55Make wireguard start at boot – VPS machine
systemctl enable wg-quick@wg0.service
systemctl enable wg-quick@mull.service
sudo systemctl daemon-reloadMake wireguard start at boot – client machine
systemctl enable wg-quick@wg0.service
sudo systemctl daemon-reloadClosing thoughts
This took longer that I thought it would to write. I hope this helps somebody. I don’t provide support for this. I’m not responsible for anything wrong by using this, please use common sense and test.
I’ve tested this with Mullvad VPN and ProtonVPN.
Enjoy your day.